
So my cameras finally arrived from the far east, and I was anxious to get them up and running. I posted previously (here) what I was looking for in a camera and my reasons for ordering etc. I decided to order three different Reolink variants, as well as a Netgear POE+ switch to power it all. In this post, I’m going to walk you through the simplest (IMO) way to connect them up and get them running.

First Impressions:
The boxes came well wrapped and securely packaged. I don’t want to go through full unboxing details here, there are plenty of those on Youtube, but in a nutshell they all came with a manual, ethernet cable, hardware for mounting (pair of screws and rawplugs, template

), and a grommet/assembly to seal the cable connection.
Neither the RLC-820A nor the RLC-810A came with a psu, so keep this in mind. There looks to be a provision for powering them via mains, but it’s not included. I would assume anyone buying these would want POE anyway, but just in case! The 510WA did come with a psu, and will not work with POE (this didn’t bother me, I wanted wireless in this instance).
The 820A is about the size of a softball / small grapefruit and feels well made.

The 810A is smaller than I expected, at least judging by the photos and marketing materials you see online, it’s decent in weight, and again feels pretty robust.


The 510WA is slightly larger than the 810A.

All of the units have the ability to record to micro SD, and the slots are accessible after removing two screws, which should help make it secure in the event of a casual thief or nosey child. I actually struggled to find the slot on the 820A, but you have to rotate the camera as far down as it will go, exposing the slot at the back.
POE+:
Now in order to power these puppies, I needed POE. I decided to go with an 8 port POE+ switch from Netgear. I didn’t bother to go managed as I have a NIC dedicated to CCTV on my pfsense box, and so am already capable of separating the cameras out on to their own network for security purposes. If you are running a simple router/firewall from your ISP, then I would probably go with a managed POE switch, so you can use Vlans to keep things orderly. I am running Unifi access points, so I am also able to segregate the 510WA by giving it a unique SSID and piping that into the CCTV network.

In terms of power needs, online it says that the cameras require: IEEE 802.3af, 48V Active. I searched online and settled on the Netgear GS108PP. You can find a link below (affiliate).
It’s 123w total, capable of up to 30w per port, so should be more than adequate to power these.
Set Up:
Now being IP cameras there is a wealth of software you can use to connect to them for viewing. There’s a host of windows, android, linux apps, not to mention docker containers. I’ll go through what I thought was the quickest and easiest route to get them connected, and viewable. It’s possible to do this via iOS/Android apps or even via a web browser, but I chose to download Reolink’s official app.

Once received, installing it took only a few seconds. I plugged a camera into the switch and within seconds, it showed up in the app. It was literally a case of clicking on the camera and pressing configure. by default the login is admin, and the password is blank, so you need to set yourself a password.

Alternatively, if you knew the ip address of the cameras on your network, you could go directly to the webspage and configure from there. It literally is a case of entering the word admin and you’re in.

I opted for the android app setup for the first two. Within a minute I had both cameras sat in my feed. You have access to their settings from the app. As soon as I opened the app it found the cameras. I just had to enter the password that I had previously set up and they were live (note I hadn’t plugged in the third camera at this point, so only 2 are showing).

Staying in the app, these are the settings you can expect to be faced with:

All pretty self explanatory. Next it was time to fire up the Reolink app on windows 10. I was hoping it would be on chocolatey, but alas it hadn’t made it on to their community packages yet. I went to the Reolink webstite and downloaded it from there. within a few seconds, the app was installed, and the two cameras were found immediately. I decided to set up the third one in the Windows app just to see if it was any easier.


Accessing the other two was as simple as just entering the password that we set up previously. In this app I had access to all the settings. I was able to turn IR lighting on/off, choose where to record the footage.
If you click on the camera settings in the app it gives you the option to record to an microSD card. I didn’t bother with this, so ignored the setting. If you click on the settings on the app though (not cameras) you can choose to save by choosing the directory on your machine or network. if you wanted stills, that could go in its own directory. It’s super user friendly.


Home-Assistant Integration:
I don’t want to get too much into the recording aspect or stream quality settings as I will cover those in a future post. I will be looking to manage these under some other software, but I did want to get these into Home-Assistant. There are several ways of doing this, with snippets of code and integrations. some are more difficult than others. Fortunately for us, someone has already written a very nice integration for us which takes away all the pain!
In order to use this integration, we’re going to need to use HACS. I am not going to go through installing that, instructions can be found here. Once installed, we need to add a custom repository to it.
- Click on HACS in the Home Assistant menu
- Click on
Integrations - Click the top right menu (the three dots)
- Select
Custom repositories - Paste the repository URL (
https://github.com/fwestenberg/reolink_dev) in the dialog box - Select category
Integration - Click
Add - Click
Installon the Reolink IP camera box that has now appeared
Restart your Home-Assitant server and clear your browser cache. You can now go to Configuration -> Integrations -> Reolink. Add the integration and a small window will appear.


Literally fill in the IP address, user/password, and you’re good to go. Rinse and repeat for each camera you have. As long as you’ve followed all the steps above, you should now be faced with the three camera entities in Home-Assistant. Clicking on each will reveal further attributes which you can add to Lovelace at the click of a button.
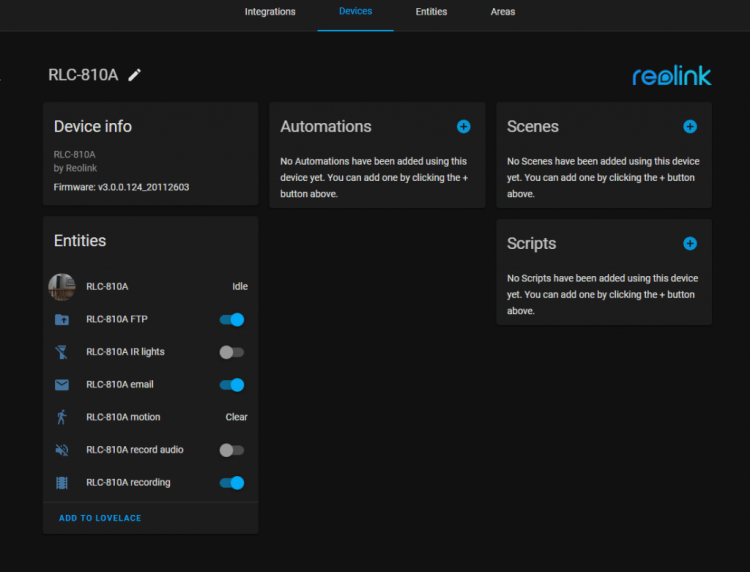
This is only one way to get the cameras into Home-Assistant, and am sure people have had great success with other methods, but for me, this just made sense. Clicking on the picture window in Lovelace brings up the camera full screen for further inspection.

I like that you have the ability to toggle on or off the recording functions as well as the IR lights etc. As someone on facebook mentioned to me, they’re into Astrophotography (as am I) so to be able to turn off the IR lights was key. I also like that the motion trigger is accessible. It means that I can access that in Home-Assistant or Node-red and use that sensor to trigger other things.
For example:
- I can turn on the IR lights at a certain time of the evening once things get dark.
- I can turn on a separate IR blaster if motion is detected in the garden, or other “security lights.”
- I can turn off audio recording (for privacy) when we’re home and turn it back on when we leave. I have a great presence detection routine set up for those of you interested (see here).
Troubleshooting:
One thing to note is that if you find the 4k cameras are freezing in Home-Assistant and not displaying the full picture when you click on the image, you might have to go back to the integration and change the stream to Sub and make sure you’re using RTMP protocol (I think it’s the default anyway). This has something to do with the main stream being H.265 and Home-Assistant not playing nicely with it. Once configured to sub, reload the integration for that camera and clear your browser cache. After a few moments, the streams will come back and you’ll be up and running again.

Useful but Controversial:
I also really liked this one useful but controversial feature. Each camera has the ability to set up DDNS on them individually. Let’s say you want to monitor something remotely, and you don’t want to install a complete “system” at the remote location. You could literally set up DynDNS or NOIP and with the help of one port forward, monitor that one remote camera anywhere in the world. As long as it has an internet connection and power, you’re golden. No integration issues, no difficult security steps, literally, one entry on the router. I appreciate that this is not without its risks, but this is probably the most simple way to bring in a remote camera with minimal fuss at the remote end.

Reolink Cloud:
I did have a look at the reolink cloud option, but as far as I could tell it wasn’t applicable for these devices. If you look here, you can see the supported devices, and these aren’t on it. I have no wish to subscribe and I don’t wish to use external servers when it comes to my home automation. Right now am having a play with the hardware. In due course, the CCTV network will be blocked from the internet, and the footage will be piped into some third party programs. I will be using pfSense for routing traffic from the NVR to the rest of the LAN where needed.
In Summary:
These cameras are well made, well priced and were very easy to set up. I think the easiest way to get them going is to just download the Windows 10 app and plug them in. You will literally have the cameras set up within a minute or so. Thanks to the work of fwestenburg (the integration dev), getting the cameras loaded into Home-Assistant didn’t take long at all. Am sure for some of you with specific needs, you will have your own methods, but for me, I like to keep things simple. I chose a variety of cameras to test and play with. I am impressed with the wireless footage coming out of the 510WA. I am not in a position to permanently mount these yet as am in a rental, otherwise I’d be going 4k, wired all the way, but so far, I haven’t noticed any latency or issues with it being on wireless. YMMV! I guess it depends on the strength of your wifi network, I’m using a unifi AC Pro (affiliate link here) and it’s covering 250m2 house without issue.
The other 4k cameras are great. As time goes on I’ll test quality versus bandwidth / storage to see what makes the most sense and I’ll report back. I’ll also post more as I play with third party solution, as well as some of the quirky automations I will set up. For now though, am impressed.
Discounts:
This post wasn’t sponsored by Reolink in any way shape of form. I paid for these out of my own beer tokens, but that being said, I am an affiliate. If any of you are interested in purchasing cameras from Reolink, please consider using the links below. It won’t cost you anything, but will help to support the blog and pay for hosting costs etc. Bookmark the page as I will update the offers as and when they change.
These are deals direclty from Reolink UK. Click on the link and on checkout paste in the code (please let me know if any are stale):
I’ll most likely create some kind of store page in the future on the site where people can check what discounts are currently available, but for now this will have to suffice. I do have US discounts too so reach out if there’s anything reolink you’re looking for.
If your interested in sharing your own solutions, tips and tricks with like minded people perhaps you’d consider joining our facebook group. The aim of this group will hopefully be more show and tell rather than support, but that’s not to say we can’t lend a helping hand!
https://www.facebook.com/groups/386238285944105

Dear Andrew! You did the best article in the net about that very subject. Thank you so much. Just wish I had found your article earlier.
Keep on going!
Regards, Ricci
P.S.: Love your house and setting in the mountains 😉
Thank you very much for the kind words. We’ve since moved on from there but felt very honoured to have got to live there!