
I’m a big fan of Plex, and have been using it for years. I have a lifetime Plexpass subscription, and an enterprise server containing not only all my movie and music backups, but also my TV recordings. I use an HD homerun which turns Plex into the perfect DVR. I’ve already shown you how you can control lighting and other devices via the webhook function built into Plex (see here), but I wanted to do more. I recently stumbled across an excellent Plex integration in node-red called: node-red-contrib-plex-ws. When configured correctly this node can output a wealth of information from your Plex server. It outputs everything you could possibly want to know about your server’s activity as well as a wealth of things you’ll never want to know again. In this post, I wanted to scratch the surface with a couple of flows that could be useful, as well as some ideas to build on. Let’s kick it off with the configuration of the node.
Firstly, go to your node-red install and go to “manage palette”, then click on the install tab and paste in node-red-contrib-plex-ws after a short moment, you should see the node come up and you can install it. When it’s finished, you’ll find two new nodes available to you on the left hand side.


Drag out the notification node and connect it to the debug. This will effectively dump out every single piece of information from your Plex server. You’ll need to double click the Plex node and configure the relevant Plex server. You can add the ip address or hostname (handy if your Plex server is at a remote location) with the port. As well as the location, you’re also going to need your “token.” You can get that by following the instructions here. Fortunately, I already had mine to hand, as I have Plex configured with my Home-Assistant installation, so it was just a case of copying the token out of my !secrets file. I left the API timeout as standard and hit deploy. That’s it.

Next I pressed play on Plex, and after a brief moment, the debug window started filling up with information. To be honest this notification node, I didn’t find too useful. It churned out so much info that it soon swamped the debug window, so I stopped its output and turned my attention to the playing node. This can be more useful to us. Out of the box, the playing node contains filters to allow you to limit what you wish to receive in debug. If you double click the node, select the Plex server you previously set up, you will see at the bottom a small add button. If you hit add, you can then select which filter to apply (title, user, etc). You can see more of this in action here. Personally, I’m happy to receive everything in debug, and then add switch nodes from there to pick out exactly what I am looking for.

Again, if you drag this node directly to the debug and start to carry out some operations in Plex, you’ll start to see the information come streaming in. Initially I thought I would focus on something simple, like toggling a switch when I changed the status of Plex. For this, I was using my new Sonoff R3 pro which I covered in my previous blog post. It makes a great addition to my test bench. For example, I wanted to turn on a series of lights according to the output of Plex. So “playing” turned on relay 1, “paused” turned on relay 2, and “stopped” turned on relay 3. I could have used interlocking as illustrated in the previous post, but I couldn’t be bothered to complicate things. I set up the switch node accordingly. For those of you just starting out, you can see a full walk through on that in this post. I hit deploy, and immediately, the relays started firing as I cycled through the operations in Plex on my phone.


A good use case for this could be the following:
Press play, and turn the lights off in the living room/home-cinema
Press pause, and raise the lights up to 50% brightness
Press stop, and raise the lights all the way up to 100%
So far so good. Next, I wanted to tackle something a little more advanced, so I decided to go throught the debug information until I found what I was looking for. I bascially wanted to be able to trigger an alert dependent on the rating of the content being played. For example, imagine a child selecting a film rated 18+ (UK) or R (US), maybe you’d want to be notified? Maybe you’d want to go a step further and have the screen turn off, or the home-cinema receiver switch off. I know that Plex already has parental rating control built into it, and also you can give each person their own login, but this might be useful none the less. I’ll show you how I did this, and you’ll then see how easy it is to adapt to another film attribute.
First we need to set up another switch node. I needed a list of all the Plex Guidance ratings, which I found in the app.

I then configured a switch node accordingly. Again, I wired the outputs to correspond with various guidances to toggle my Sonoff R3 pro.

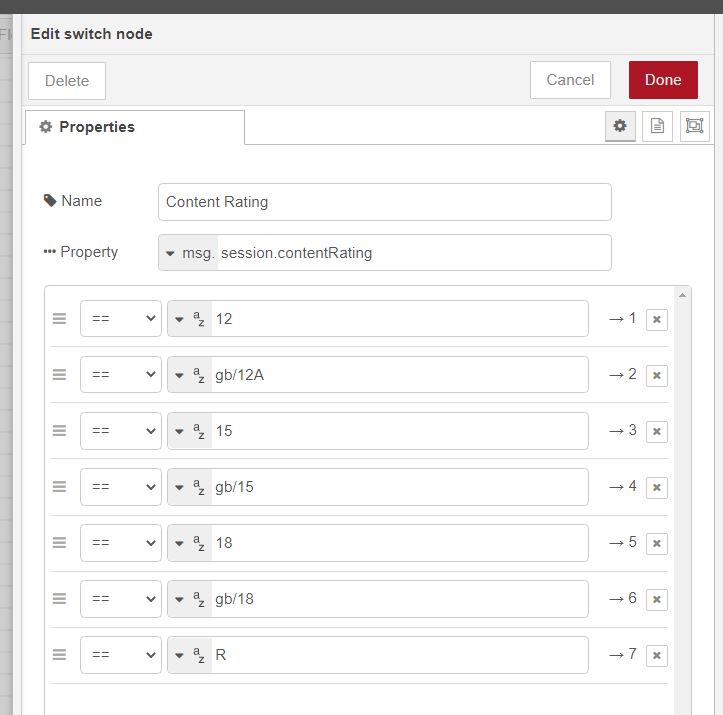
It would be extremely easy to send a Telegram/Pushover/Home-Assistant notification, or Google TTS for example as needed. Once connected up, I hit deploy, and again started to cycle through some films with different classifications and the relays started whirring. One thing to note, I needed to add a second switch with the filter “playing” otherwise the notification would trigger whenever you played, paused or stopped, and I was just looking for it to fire when it was initially played. I also went a step further, and added a further switch with different users in it. One tip for those of you looking at the sheer amount of data contained in the debug. When you get to the attribute that you wish to track, you can click on the small button at the end of it and copy the value. You can then paste that into the switch node to act as the filter. This little tip will save you a lot of time trying to decipher the JSON and working out what the correct filter entry is. In my case, I needed to add session.contentRating to the property field in the Switch node (see above).

I’ve been thinking about some other uses for this node. Although I haven’t constructed any flows for them, I’m just thinking aloud.
- You could read the attributes of a file playing (width/height) and potentially could automate an anamorphic lens to be used if necessary in front of a projector (high end ones can be triggered usually).
- If you have LED strips around the screen or different “colours” in the viewing room/home cinema, you could potentially change the scene according to the genre being played.
- If you hit play on Plex, you could trigger a flow which could take a reading from a lux sensor in the room and close curtains/blinds accordingly if the room is to bright. Of course when you hit stop they could reverse and open.
- You could hit play on Plex and then have any type of music streamer (sonos, google home, amazon echo) either mute or decrease to a volume that’s low enough to not compete with the film, allowing you to enjoy your movie.
- For those of you with a separate cinema room, you could use a red/amber/green bulb outside the door for an on air/off air type effect according to whether you’re playing, pausing, or everything is stopped.
- If you hit play on Plex, you can trigger a surround sound receiver to switch on, as well as corresponding amplifiers. This could be fairly easy to do, although I’d sooner ask Alexa or Google to turn on “movie time” and have this step already triggered and the Plex app fired up (i’d use adb to control my Nvidia Shield and TV/Projector as shown here though.)
Any other ideas you can think of? let me know in the comments section.
If you enjoyed this type of content and would be interested in sharing your own solutions, tips and tricks with like minded people perhaps you’d consider joining our facebook group. The aim of this group will hopefully be more show and tell rather than support, but that’s not to say we can’t lend a helping hand 🙂
https://www.facebook.com/groups/386238285944105
Cheers!
